Mittens and funny hat
I got the pink and blue mittens from the last entry done and felted. I think they came out really nice. 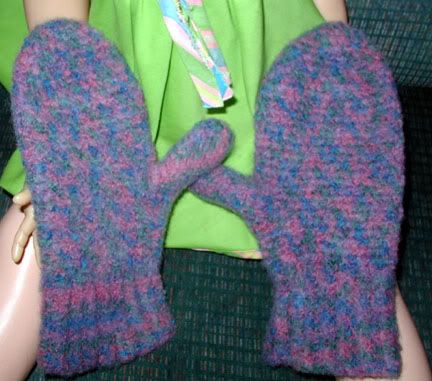 I like how they're all warm and fuzzy. Now to see if they're the right size for Megan.
Closeup of mitten. The thumb looks huge here, but it must be the camera angle, 'cause it's not that big.
I've put the ski mask aside for the time being. I was getting way too frustrated with it. I'll pick it up again in the next couple of days and the whole thing will probably come together much easier.
I also crocheted a silly cap for one of the girls tonight (don't know for sure which one is going to get it).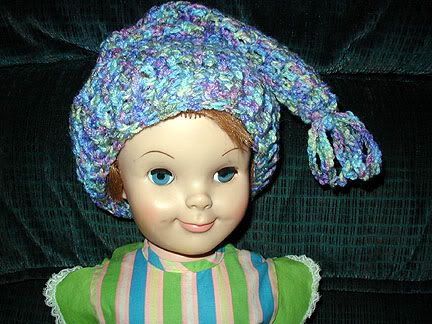 Doesn't this doll just look positively evil? She makes a good model for kidswear though because she's so big.
Here is my mitten pattern:
Lynn’s Feltable Mittens
 One mitten finished, one with just the cuff done. Both mittens after felting. Felting instructions are at the end of the pattern.
2 - 50g balls of 4 ply knitting worsted.
I used Lion wool. If you plan to felt the mittens, you will need to buy 100% wool yarn. Check the label to make sure it isn’t superwash wool, as this type won’t felt. Crocheting this pattern as printed will yield mittens the right size for an 8-12 year-old child. Adjust as instructed for larger or smaller sizes.
Hook – G if you crochet loose, H if you crochet tight.
My notes, such as where to make adjustments for other sizes, are in blue.
NOTE: This pattern is designed so the mitten will fit both left and right hands.
CUFF - All stitches on the cuff
are through the back loop of stitch only.
Ch. 14 to begin.
ROW 1 - 1 sc in 3rd ch from hook, 1 sc in next 11 chains, ch 1, turn. (12 sc)
ROW 2 - 1 sc in next 12 sc (remember, through the back loops of stitches only), ch 1, turn. (12 sc) (If you are making larger mittens, add a couple more rows here - for smaller mittens, subtract a couple rows.)
ROWS 3 to 26 - Same as Row 2.
ROW 27 - Joining row, ss to corresponding chs in Row 1, turn inside out (this is the right side).
CONTINUE AS FOLLOWS FOR THE REST OF THE MITTEN (all sts through both loops):
ROW 1 - With right side of work towards you, ch 1, 1 sc in the end of each row of ribbing. Join with ch 1. (27 sc, - this st count will be different on all rows if you are making smaller or larger mittens, example: if you added 2 more rows on the cuff for larger mittens, you will have more sc here - less if you are making smaller mittens.)
ROW 2 - *Sc around (mark beginning of rows with a safety pin, do not turn. The rest of the mitten is worked in a spiral). (30 sc)
ROW 3-8 - Sc around, ss to join.
ROW 9 - 1 sc in next st, ch 5, skip next 5 sts (this is for the thumb opening), 1 sc in the next 24 sts, ss to join. (make a smaller thumb opening for smaller mittens, larger thumb opening for larger mittens. For mittens that are going to be felted, I used 7 sts for the thumb for an 8-10 year old girl)
ROW 10-20 - Repeat Row 2 (work the 5 chains for thumb opening as if they were regular sts. Add a few more rows for larger mittens, subtract rows for smaller mittens.)
ROW 21 - 1 sc in first st, decrease over the next 4 sts by crocheting 2 sc tog twice, 1 sc in next 11 sts, dec over next 4 sts by crocheting 2 sc tog twice, 1 sc in next 10 sts, ss to join. (26 sc)
ROW 22 – Sc around.
ROW 23 - 1 sc in the first st, dec over next 4 sts by crocheting 2 sc tog twice, 1 sc in next 9 sts, dec over next 4 sts by crocheting 2 sc tog twice, 1 sc in next 8 sts, ss to join. (22 sc)
ROW 24 – Sc around, ss to join.
ROW 25 - 1 sc in first st, dec over next 4 sts by crocheting 2 sc tog twice, 1 sc in next 7 sts, dec over next 4 sts by crocheting 2 sc tog twice, 1 sc in next 6 sts, ss to join. (18 sc)
ROW 26 – Sc around, ss to join.
ROW 27 - 1 sc in first st, dec over next 4 sts by crocheting 2 sc tog twice, 1 sc in next 5 sts, dec over next 4 sts by crocheting 2 sc tog twice, 1 sc in next 4 sts, ss to join. (14 sc)
ROW 28 - 2 sc, * 2 sc tog, 1 sc in next st *, Repeat from * to * 3 more times, ss to join.
Cut yarn leaving about an 8 to 10 inch tail, pull yarn through the last ch1. Using a darning needle, weave yarn through the 14 sts of last Row, pull tight to close up the end of the mitten, weave in yarn to secure closing and fasten off.
THUMB
ROW 1 - Join yarn, ch 1 and 1 sc in the first st of thumb opening, 1 sc in the next 4 sts, pick up 7 sts around the remaining thumb opening, ss to join to first sc. (12 sc - more or less if you are making smaller or larger mittens.)
ROW 2-6 – Sc around, ss to join. (Add a few more rows for larger thumb, subtract rows for smaller thumb.)
ROW 7 - 1 sc in next 4 sc, 2 sc tog, 1 sc in next 4 sc, 2 sc tog, ss to join. (10 sc)
ROW 8 – Sc around, ss to join.
Cut yarn leaving about an 8 to 10 inch tail, pull yarn through the last ch1. Using a darning needle, weave yarn through the 10 sts of the last row, pull tight to close up the end of the thumb, weave in yarn to secure closing and fasten off. Weave in the tail end at the beginning of the cuff.
Felting Instructions
Set washer at lowest water level on hot wash, cold rinse cycle. Add small amount of laundry soap, place mittens in washer along with a couple of T-shirts or pairs of jeans to aid in agitation. Don’t use towels, as they shed lint and your mittens will end up looking old and dull. Run washer through cycle, checking mittens after five minutes. Continue to check them every five minutes until they are the size you want. Stop wash cycle if it hasn’t come to the end to avoid further shrinkage. Run through rinse and spin. Remove mittens from washer, gently reshape and let dry on
a folded towel. These mittens will be the warmest you will ever wear!
Abbreviations used in this pattern
sc = single crochet st = stitch ss = slip stitch
sc tog = single crochet together ch = chain
dec = decrease by crocheting two stitches together
I like how they're all warm and fuzzy. Now to see if they're the right size for Megan. Closeup of mitten. The thumb looks huge here, but it must be the camera angle, 'cause it's not that big.
I've put the ski mask aside for the time being. I was getting way too frustrated with it. I'll pick it up again in the next couple of days and the whole thing will probably come together much easier.
I also crocheted a silly cap for one of the girls tonight (don't know for sure which one is going to get it).
Doesn't this doll just look positively evil? She makes a good model for kidswear though because she's so big. Here is my mitten pattern:
Lynn’s Feltable Mittens
One mitten finished, one with just the cuff done. Both mittens after felting. Felting instructions are at the end of the pattern. 2 - 50g balls of 4 ply knitting worsted.
I used Lion wool. If you plan to felt the mittens, you will need to buy 100% wool yarn. Check the label to make sure it isn’t superwash wool, as this type won’t felt. Crocheting this pattern as printed will yield mittens the right size for an 8-12 year-old child. Adjust as instructed for larger or smaller sizes.
Hook – G if you crochet loose, H if you crochet tight.
My notes, such as where to make adjustments for other sizes, are in blue.
NOTE: This pattern is designed so the mitten will fit both left and right hands.
CUFF - All stitches on the cuff
are through the back loop of stitch only.
Ch. 14 to begin.
ROW 1 - 1 sc in 3rd ch from hook, 1 sc in next 11 chains, ch 1, turn. (12 sc)
ROW 2 - 1 sc in next 12 sc (remember, through the back loops of stitches only), ch 1, turn. (12 sc) (If you are making larger mittens, add a couple more rows here - for smaller mittens, subtract a couple rows.)
ROWS 3 to 26 - Same as Row 2.
ROW 27 - Joining row, ss to corresponding chs in Row 1, turn inside out (this is the right side).
CONTINUE AS FOLLOWS FOR THE REST OF THE MITTEN (all sts through both loops):
ROW 1 - With right side of work towards you, ch 1, 1 sc in the end of each row of ribbing. Join with ch 1. (27 sc, - this st count will be different on all rows if you are making smaller or larger mittens, example: if you added 2 more rows on the cuff for larger mittens, you will have more sc here - less if you are making smaller mittens.)
ROW 2 - *Sc around (mark beginning of rows with a safety pin, do not turn. The rest of the mitten is worked in a spiral). (30 sc)
ROW 3-8 - Sc around, ss to join.
ROW 9 - 1 sc in next st, ch 5, skip next 5 sts (this is for the thumb opening), 1 sc in the next 24 sts, ss to join. (make a smaller thumb opening for smaller mittens, larger thumb opening for larger mittens. For mittens that are going to be felted, I used 7 sts for the thumb for an 8-10 year old girl)
ROW 10-20 - Repeat Row 2 (work the 5 chains for thumb opening as if they were regular sts. Add a few more rows for larger mittens, subtract rows for smaller mittens.)
ROW 21 - 1 sc in first st, decrease over the next 4 sts by crocheting 2 sc tog twice, 1 sc in next 11 sts, dec over next 4 sts by crocheting 2 sc tog twice, 1 sc in next 10 sts, ss to join. (26 sc)
ROW 22 – Sc around.
ROW 23 - 1 sc in the first st, dec over next 4 sts by crocheting 2 sc tog twice, 1 sc in next 9 sts, dec over next 4 sts by crocheting 2 sc tog twice, 1 sc in next 8 sts, ss to join. (22 sc)
ROW 24 – Sc around, ss to join.
ROW 25 - 1 sc in first st, dec over next 4 sts by crocheting 2 sc tog twice, 1 sc in next 7 sts, dec over next 4 sts by crocheting 2 sc tog twice, 1 sc in next 6 sts, ss to join. (18 sc)
ROW 26 – Sc around, ss to join.
ROW 27 - 1 sc in first st, dec over next 4 sts by crocheting 2 sc tog twice, 1 sc in next 5 sts, dec over next 4 sts by crocheting 2 sc tog twice, 1 sc in next 4 sts, ss to join. (14 sc)
ROW 28 - 2 sc, * 2 sc tog, 1 sc in next st *, Repeat from * to * 3 more times, ss to join.
Cut yarn leaving about an 8 to 10 inch tail, pull yarn through the last ch1. Using a darning needle, weave yarn through the 14 sts of last Row, pull tight to close up the end of the mitten, weave in yarn to secure closing and fasten off.
THUMB
ROW 1 - Join yarn, ch 1 and 1 sc in the first st of thumb opening, 1 sc in the next 4 sts, pick up 7 sts around the remaining thumb opening, ss to join to first sc. (12 sc - more or less if you are making smaller or larger mittens.)
ROW 2-6 – Sc around, ss to join. (Add a few more rows for larger thumb, subtract rows for smaller thumb.)
ROW 7 - 1 sc in next 4 sc, 2 sc tog, 1 sc in next 4 sc, 2 sc tog, ss to join. (10 sc)
ROW 8 – Sc around, ss to join.
Cut yarn leaving about an 8 to 10 inch tail, pull yarn through the last ch1. Using a darning needle, weave yarn through the 10 sts of the last row, pull tight to close up the end of the thumb, weave in yarn to secure closing and fasten off. Weave in the tail end at the beginning of the cuff.
Felting Instructions
Set washer at lowest water level on hot wash, cold rinse cycle. Add small amount of laundry soap, place mittens in washer along with a couple of T-shirts or pairs of jeans to aid in agitation. Don’t use towels, as they shed lint and your mittens will end up looking old and dull. Run washer through cycle, checking mittens after five minutes. Continue to check them every five minutes until they are the size you want. Stop wash cycle if it hasn’t come to the end to avoid further shrinkage. Run through rinse and spin. Remove mittens from washer, gently reshape and let dry on
a folded towel. These mittens will be the warmest you will ever wear!
Abbreviations used in this pattern
sc = single crochet st = stitch ss = slip stitch
sc tog = single crochet together ch = chain
dec = decrease by crocheting two stitches together
posted by MaggieBlue at 11:30 PM
![]()

0 Comments:
Post a Comment
<< Home